在当今的数字化环境中,对于可靠性和安全合规性方面的需求比以往任何时候都更加重要。对于互联网连接受限或处于不利条件的企业而言,选择标准的 红帽 OpenShift 安装还是非联网(或称为隔离环境)安装,可能会带来翻天覆地的变化。非联网安装使企业能够在对外隔离、注重安全且独立的环境中建立和维护 OpenShift 集群,从而确保在这个日益复杂的世界中搭建可靠的基础架构作为成功的必要条件。
在本文中,我们将探讨这种基本部署和运维模式的优势以及关键注意事项。
安装方法
首先,我们来了解一下适用于自助式 OpenShift 集群的各种安装方法。
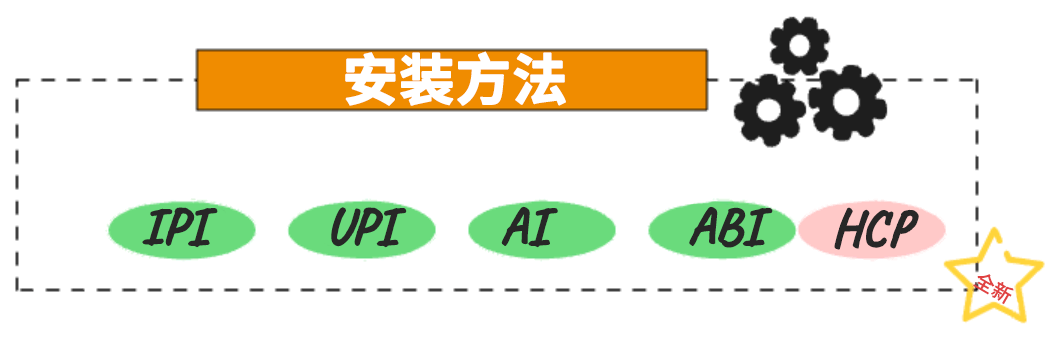
图 1:不同的安装方法
全栈完全自动安装方式 (IPI)
IPI 是最直接的安装方法之一。它适合想要获得引导式自动化安装体验的用户。在 IPI 中,OpenShift 会置备基础架构,包括虚拟机或物理硬件。该方法通常用于云提供商,但也可用于本地安装。
辅助安装程序 (AI)
辅助安装程序是一个用于执行 OpenShift 安装的基于 Web 的交互式工具。此方法非常适用于网络已连接互联网的集群。此外,它还提供了 RESTful API 以支持自动化和高级配置场景。AI 也是红帽高级集群管理的一部分。
基于代理的安装程序 (ABI)
基于代理的安装包含可引导 ISO,内含辅助发现代理和辅助服务。基于代理的安装是 OpenShift 安装程序的一个子命令。它会生成可引导 ISO 镜像,其中包含部署 OpenShift 集群所需的所有资产,以及可用的 OpenShift 发行版镜像。这种方法非常适合隔离、非联网或网络受限的环境。
现有基础设施安装方式 (UPI)
UPI 是一种灵活的安装方法,适用于愿意自行管理基础架构的用户,无论其基础架构是在本地、在其数据中心还是在公共云提供商上。使用 UPI 时,用户要负责置备虚拟机、存储和网络组件,如负载平衡器。在完成基础架构置备后,可以使用 OpenShift 的安装程序在所选的基础架构上部署 OpenShift。
托管控制平面 (HCP)
可以使用两种不同的控制平面配置来部署 OpenShift 集群:单机或托管控制平面。单机配置使用专用的虚拟机或物理计算机来托管控制平面。借助 OpenShift 的托管控制平面,您可以在托管集群上将控制平面创建为容器集,而无需为每个控制平面创建专用的虚拟机或物理机。请参阅官方 HCP 文档和 本文,以了解更多信息。
什么是非联网安装?
不同的场景适合不同的安装类型。为您的用例选择正确的方法非常重要。对于高度重视安全合规性、控制和可靠性,并且直接互联网连接受到限制或不可取的企业和环境而言,非联网的 OpenShift 安装是一种至关重要的解决方案。它可提供必要的基础架构,以便在对外隔离、注重安全且独立的网络中管理和维护 OpenShift 集群。
受限:非联网
在非联网的环境中运行时,OpenShift 集群没有直接的互联网连接,甚至没有通过代理的互联网连接。支持该环境所需的所有内容都必须在本地镜像。运行 oc 工具集的机器必须能够直接或通过代理间接访问互联网,同时还需要能够访问镜像仓库以及 OpenShift API。
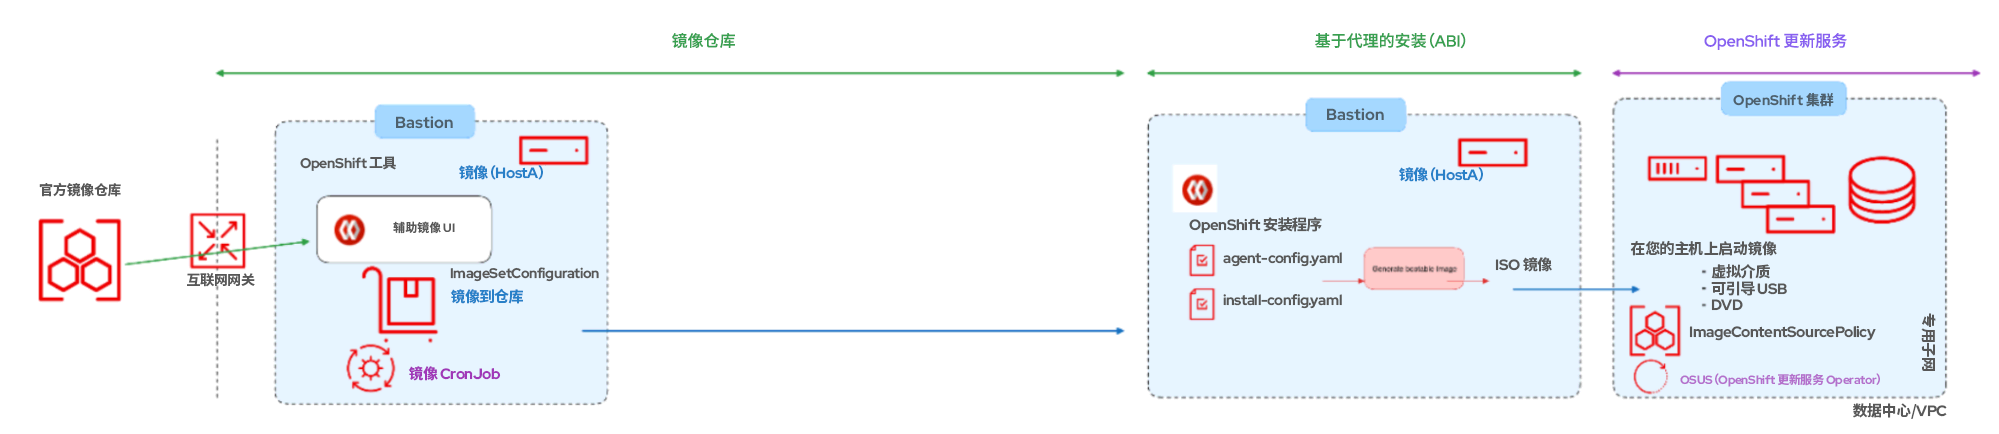
图 2:受限 - 非联网
在本博客中,我们重点介绍适用于非联网/受限网络的基于代理的安装方法,此时可以通过 bastion 主机实现互联网连接。
受限:隔离
根据 RFC 4949,“隔离”是指两个系统没有物理连接,并且也没有自动化的逻辑连接。数据通过人工干预进行手动传输。
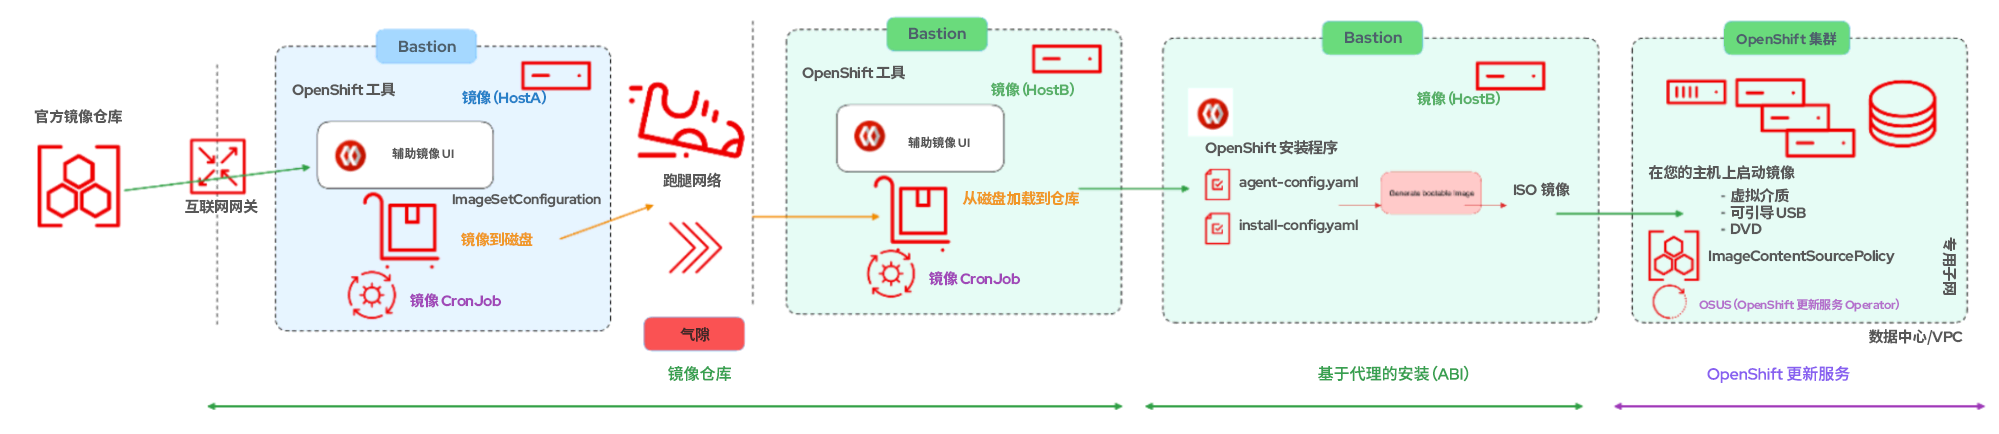
图 3:受限 - 隔离
在这种情况下,OpenShift 集群没有直接的互联网连接,甚至没有通过代理的互联网连接。支持该环境所需的所有内容都在本地镜像。执行安装的机器可以访问镜像注册表和 OpenShift API,但不能以任何形式访问互联网。所有内容必须通过 U 盘、光盘介质或其他“离线”方式交付。
如果 bastion 主机没有互联网连接,请参阅官方 文档的相应部分以执行其他步骤,将镜像集镜像到磁盘,然后将磁盘上的镜像集文件镜像到镜像服务器上,这些步骤超出了本文的范围。
执行非联网安装所需的工具
在开始使用基于代理的安装程序进行实际安装之前,我们先讨论一下执行非联网安装所需的工具。
红帽 OpenShift 的镜像注册表
您可以将支持 OpenShift 安装及其后续产品更新所需的镜像都镜像到支持 Docker v2-2 的容器镜像注册表,例如红帽 Quay。如果您无法访问大规模容器镜像仓库,您可以使用红帽 OpenShift 镜像注册表,这是 OpenShift 订阅包含的小规模容器镜像仓库。
OpenShift 客户端(oc)镜像插件
oc-mirror 命令是一个 OpenShift CLI(oc)插件,可用于对镜像进行镜像。您必须从具有互联网连接的系统运行 oc-mirror,才能从原始来源下载所需的内容。
镜像注册表的前提条件
- OpenShift 订阅。
- 红帽企业 Linux(RHEL)8 或 9,安装有 Podman 3.4.2 或更高版本以及 OpenSSL。
- 红帽 Quay 服务的完全限定域名,该域名必须可通过 DNS 服务器解析。
- 2 个或更多 vCPU。
- 8 GB RAM。
- 对于 OpenShift 4.13 发行版镜像,大约需要 17 GB 的空间;如果包括 OpenShift 4.13 发行版镜像和 OpenShift 4.13 红帽 Operator 镜像,则大约需要 358 GB 的空间。建议为每个流预留高达 1 TB 或更多的空间。
安装任务
在安装了基础 RHEL 虚拟机后,需要将以下工具下载到 bastion 主机:
- Podman 3.4.2 或更高版本
$ sudo dnf install -y podman- OpenShift 客户端(oc CLI)
$ wget https://mirror.openshift.com/pub/openshift-v4/x86_64/clients/ocp/stable/openshift-client-linux.tar.gz
$ tar --extract --file openshift-client-linux.tar.gz
$ chmod +x oc
$ sudo mv oc /usr/local/bin/$ wget https://developers.redhat.com/content-gateway/rest/mirror/pub/openshift-v4/clients/mirror-registry/latest/mirror-registry.tar.gz
$ tar --extract --file mirror-registry.tar.gz
$ chmod +x mirror-registry$ wget https://mirror.openshift.com/pub/openshift-v4/x86_64/clients/ocp/stable/oc-mirror.tar.gz
$ tar --extract --file oc-mirror.tar.gz
$ chmod +x oc-mirror
$ sudo mv oc-mirror /usr/local/bin/镜像注册表安装
可以使用单个命令安装镜像注册表:
$ ./mirror-registry install --quayHostname<hostname fqdn> \
--quayRoot /root/ocpmirror
例如:
$ sudo mirror-registry install \
--quayHostname bastion.j9287.dynamic.opentlc.com \
--quayRoot /root/ocpmirror
成功安装镜像注册表将返回如下输出:
[...]
INFO[2023-10-31 11:17:28] Quay installed successfully, config data is stored in /root/ocpmirror
INFO[2023-10-31 11:17:28] Quay is available at https://bastion.j9287.dynamic.opentlc.com:8443 with credentials (init, 7HFdq385A9EG0ngVWo4cKeDtxRzp621N)
验证是否可以使用凭据提供的 URL 访问镜像注册表:
$ podman login -u init -p <password generated by installer> \
https://<hostname fqdn>:8443 \
--tls-verify=false
例如:
$ podman login -u init \
-p 7HFdq385A9EG0ngVWo4cKeDtxRzp621N \ https://bastion.j9287.dynamic.opentlc.com:8443 \
--tls-verify=false
由于镜像注册表随附自定义 CA,因此您可以导出以下变量来安全地访问注册表:
$ export SSL_CERT_DIR=/root/ocpmirror/quay-rootCA/
$ podman login -u init \
-p 7HFdq385A9EG0ngVWo4cKeDtxRzp621N \
https://bastion.j9287.dynamic.opentlc.com:8443
从 https://console.redhat.com/openshift/downloads 下载 OpenShift 提取密钥,并将下载的文件保存为 pull-secret。
从您的主目录运行以下命令,以配置注册表身份验证:
$ cat pull-secret | jq . > pull-secret.json
$ mkdir .docker ; cp pull-secret.json ~/.docker/config.json
$ echo -n 'init:7HFdq385A9EG0ngVWo4cKeDtxRzp621N' | \
base64 -w0
使用上一命令的输出,调整文件,以在 ~/.docker/config.json 中包含本地镜像身份验证:
"auths": {
 "bastion.j9287.dynamic.opentlc.com:8443": {
   "auth": "aW5pdDo3SEZkcTM3NUE5RUcwbmdWV280Y0tlRHR4UnpwNjIxTg==",
   "email": "[email protected]"
 },
至此,镜像注册表已安装并配置完成。有关更多信息,请参阅官方 文档。
对镜像进行镜像
在本节中, oc mirror OpenShift CLI 插件将用于将所需的内容镜像到镜像注册表。
在非联网环境中,您可以将镜像集直接镜像到目标镜像注册表。
在隔离环境中,您必须先将镜像集镜像到磁盘,然后再将磁盘上的镜像集文件镜像到镜像服务器上。
首先,为 ImageSetConfiguration 创建一个新文件:
kind: ImageSetConfiguration
apiVersion: mirror.openshift.io/v1alpha2
storageConfig:
 registry:
   imageURL: bastion.j9287.dynamic.opentlc.com:8443/mirror/oc-mirror-metadata # Local mirror registry URL
   skipTLS: false
mirror:
 platform:
   channels:
   - name: stable-4.13    # Version of OpenShift to be mirrored
     minVersion: 4.13.17  # Minimum version of OpenShift to be mirrored
     maxVersion: 4.13.18  # Maximum version of OpenShift to be mirrored
     shortestPath: true
     type: ocp
   graph: true   # Useful when updating in disconnected setup with OSUS operator
 operators:
 - catalog: registry.redhat.io/redhat/redhat-operator-index:v4.13 # Operators catalog to mirror
 additionalImages:
 - name: registry.redhat.io/ubi8/ubi:latest
 helm: {}
此 存储库中提供了一个示例文件。有关可用于根据需要调整此文件的选项的完整列表,请参阅 官方文档。
在本例中, ImageSetConfiguration 文件使用注册表存储后端(bastion.j9287.dynamic.opentlc.com:8443/mirror/oc-mirror-metadata),并包括从最低版本 4.13.17 到此处通道中最新版本 4.13.18 的所有 OpenShift 版本。每当使用这个镜像集配置调用 oc-mirror 时,都会评估 stable-4.13 通道中的最新版本,因此定期运行 oc-mirror 可以确保自动获取 OpenShift 镜像的最新版本。
ImageSetConfiguration 文件就绪后,运行以下命令以将内容镜像到注册表。镜像过程所需的时间因您的配置和连接速度而异。
$ oc mirror --config=imageset-config.yaml \
docker://<hostname fqdn>:8443
例如:
$ oc mirror --config=imageset-config.yaml \ docker://bastion.j9287.dynamic.opentlc.com:8443如果您需要忽略错误,可选参数 --continue-on-error 和 --skip-missing 会有所帮助。
成功执行上一命令将显示如下输出:
[...]
bastion.j9287.dynamic.opentlc.com:8443/openshift/release-images:4.13.17-x86_64
bastion.j9287.dynamic.opentlc.com:8443/openshift/release-images:4.13.18-x86_64
Writing image mapping to oc-mirror-workspace/results-1698872844/mapping.txt
Writing UpdateService manifests to oc-mirror-workspace/results-1698872844
Writing CatalogSource manifests to oc-mirror-workspace/results-1698872844
Writing ICSP manifests to oc-mirror-workspace/results-1698872844
一些文件是由 oc-mirror 生成的。其中包括 updateService:
apiVersion: updateservice.operator.openshift.io/v1
kind: UpdateService
metadata:
 name: update-service-oc-mirror
spec:
 graphDataImage: bastion.j9287.dynamic.opentlc.com:8443/openshift/graph-image@sha256:a8730004abd6a4c1d02f52d8052a69a014a4e3de677135b2dfe50259fb6b63fa
 releases: bastion.j9287.dynamic.opentlc.com:8443/openshift/release-images
 replicas: 2
文件 ImageContentSourcePolicy:
apiVersion: operator.openshift.io/v1alpha1
kind: ImageContentSourcePolicy
metadata:
 name: release-0
spec:
 repositoryDigestMirrors:
 - mirrors:
   - bastion.j9287.dynamic.opentlc.com:8443/openshift/release-images
   source: quay.io/openshift-release-dev/ocp-release
 - mirrors:
   - bastion.j9287.dynamic.opentlc.com:8443/openshift/release
   source: quay.io/openshift-release-dev/ocp-v4.0-art-dev
最后, CatalogSource:
apiVersion: operators.coreos.com/v1alpha1
kind: CatalogSource
metadata:
 name: redhat-operator-index
 namespace: openshift-marketplace
spec:
 image: bastion.j9287.dynamic.opentlc.com:8443/redhat/redhat-operator-index:v4.13
 sourceType: grpc
稍后需要使用这些文件来配置镜像注册表以进行安装,以及指示操作器和更新服务使用本地注册表。
您也可以导航到 https:// ,以登录镜像注册表的用户界面。
基于代理的安装
安装并配置了本地镜像注册表后,我们可以使用基于代理的安装程序来查看 OpenShift 的安装。在撰写本文时,基于代理的安装程序支持以下平台:
- 裸机
- vsphere
- 无
基于代理的安装使用包含辅助发现代理和辅助服务的可引导 ISO。这两者都是执行集群安装所必需的,但后者仅在其中一个主机上运行。 openshift-install agent create image 子命令会根据您提供的输入生成临时 ISO。
在 install-config.yaml 文件中,您必须包含本地镜像注册表的提取密钥和额外的证书信任捆绑包,以及指向本地镜像的 ImageContentSources。
在 agent-config.yaml 文件中,您必须包含参数“rendezvousIP”,这是将在安装过程中成为临时引导节点的主机的 IP 地址。此 IP 地址应当与其中一个节点匹配。
有关使用基于代理的安装程序的安装准备步骤的完整列表,请参阅此 链接。可以在此 存储库中找到 install-config.yaml 和 agent-config.yaml 的示例。
创建 ISO
对 install-config.yaml 和 agent-config.yaml 文件均进行了调整后,即可创建 ISO 镜像。
首先,安装 nmstate 软件包:
$ sudo dnf install /usr/bin/nmstatectl然后,下载 OpenShift 安装程序。下载的 OpenShift 安装程序版本必须与您计划安装的集群版本相匹配。在本文中,我们使用的是 Openshift 4.13.17,因此我们将先安装该版本,然后将集群更新到 4.13.18。
$ wget https://mirror.openshift.com/pub/openshift-v4/x86_64/clients/ocp/4.13.17/openshift-install-linux.tar.gz
$ tar --extract --file openshift-install-linux.tar.gz
$ chmod +x openshift-install
$ sudo mv openshift-install /usr/local/bin/
最后,创建 ISO:
$ openshift-install agent create image --dir <directory>您将看到类似于如下内容的输出:
INFO Configuration has 3 master replicas and 3 worker replicas
INFO The rendezvous host IP (node0 IP) is 192.168.94.21
INFO Extracting base ISO from release payload
INFO Base ISO obtained from release and cached at [/root/.cache/agent/image_cache/coreos-x86_64.iso]
INFO Consuming Install Config from target directory
INFO Consuming Agent Config from target directory
根据您的平台,您必须为控制平面和计算节点准备节点(裸机或虚拟机)。确保集群的所有节点都从生成的 ISO 镜像启动。
创建 DNS 记录
您必须为 DNS 中的两个静态 IP 地址创建 DNS 记录。在每条记录中,<cluster_name> 为集群名称,<base_domain> 为您在安装集群时指定的集群基础域。完整的 DNS 记录采用以下形式: <component>.<cluster_name>.<base_domain>
API VIP - api.<cluster_name>.<base_domain>
Ingress VIP - *.apps.<cluster_name>.<base_domain>
OpenShift 集群创建
您将在每个集群主机上启动 ISO 镜像,包括虚拟介质、可启动的 USB 和 DVD。
将节点配置为从您创建的 ISO 镜像启动。所有节点都从 ISO 镜像启动后,您可以使用以下命令监控安装:
$ openshift-install agent wait-for bootstrap-complete \
--dir <directory> --log-level=debug
[...]
INFO Cluster is ready for install
INFO Cluster validation: All hosts in the cluster are ready to install.
INFO Preparing cluster for installation
INFO Cluster installation in progress
INFO Bootstrap configMap status is complete
INFO cluster bootstrap is complete
引导过程完成后,您可以运行以下命令来监控进一步的进度。
$ openshift-install agent wait-for install-complete \
--dir <directory> --log-level=debug
[...]
INFO Cluster is installed
INFO Install complete!
INFO To access the cluster as the system:admin user when using 'oc', run
INFO     export KUBECONFIG=/root/auth/kubeconfig
INFO Access the OpenShift web-console here: https://console-openshift-console.apps.j9287.dynamic.opentlc.com
INFO Login to the console with user: "kubeadmin", and password: "HR377-xxxxx-yyyyy-ynxGC"
收到安装完成的消息后,您可以使用 oc 命令登录集群并验证 OpenShift 集群的版本。
$ oc get clusterversion
NAME      VERSION   AVAILABLE   PROGRESSING   SINCE   STATUS
version   4.13.17   True        False         11m     Cluster version is 4.13.17
有关基于代理的安装程序的更多详细信息,请参阅官方 OpenShift 文档。
您可以验证 ImageContentSourcePolicy,以确认 OpenShift 集群正在从本地镜像注册表接收镜像:
$ oc get imagecontentsourcepolicy
NAME             AGE
image-policy-0   18h
image-policy-1   18h
$ oc describe imagecontentsourcepolicy image-policy-0 |grep -A4 Spec:
Spec:
 Repository Digest Mirrors:
   Mirrors:
     bastion.j9287.dynamic.opentlc.com:8443/openshift/release
   Source:  quay.io/openshift-release-dev/ocp-v4.0-art-dev
$ oc describe imagecontentsourcepolicy image-policy-1 |grep -A4 Spec:
Spec:
 Repository Digest Mirrors:
   Mirrors:
     bastion.j9287.dynamic.opentlc.com:8443/openshift/release-images
   Source:  quay.io/openshift-release-dev/ocp-release
由于您的集群没有连接到互联网,您必须执行一些额外的配置才能移除所有默认目录源。请执行以下命令来修补 OperatorHub 资源,以禁用默认的 CatalogSources:
$ oc get catsrc -A
NAMESPACE               NAME                  DISPLAY               TYPE   PUBLISHER   AGE
openshift-marketplace   certified-operators   Certified Operators   grpc   Red Hat     32m
openshift-marketplace   community-operators   Community Operators   grpc   Red Hat     32m
openshift-marketplace   redhat-marketplace    Red Hat Marketplace   grpc   Red Hat     32m
openshift-marketplace   redhat-operators      Red Hat Operators     grpc   Red Hat     32m
$ oc patch OperatorHub cluster --type json \
-p '[{"op": "add", "path": "/spec/disableAllDefaultSources", "value": true}]'
operatorhub.config.openshift.io/cluster patched
$ oc get catsrc -A
No resources found
通过应用上面“对镜像进行镜像”部分中的 CatalogSource.yaml,创建指向本地镜像注册表的新 CatalogSource 资源。
apiVersion: operators.coreos.com/v1alpha1
kind: CatalogSource
metadata:
 name: redhat-operator-index
 namespace: openshift-marketplace
spec:
 image: bastion.j9287.dynamic.opentlc.com:8443/redhat/redhat-operator-index:v4.13
 sourceType: grpc

$ oc apply -f ./oc-mirror-workspace/results-1698872844/
$ oc apply -f ./oc-mirror-workspace/results-1698872844/release-signatures/
在应用后,再次运行之前尝试的验证步骤:
$ oc get po -n openshift-marketplace
NAME                                    READY   STATUS    RESTARTS   AGE
marketplace-operator-7bc7549555-4ckdm   1/1     Running   0          48m
redhat-operator-index-t4cgd             1/1     Running   0          75s
$ oc get catsrc -A
NAMESPACE               NAME                    DISPLAY   TYPE   PUBLISHER   AGE
openshift-marketplace   redhat-operator-index             grpc               82s
此时已完成的操作如下:
- 已使用基于代理的安装方法安装了新的 OpenShift 集群。
- 已从本地镜像注册表(而不是通过互联网)拉取到安装镜像。
- Operator 中心已配置为使用本地镜像注册表。
非联网环境中的 OpenShift 更新
在博客的第一部分中,我们使用 OpenShift 4.13.17 和 4.13.18 这两个版本镜像了本地注册表(请参阅 ImageSetConfiguration 文件的内容)。 对于有互联网访问的集群,红帽通过使用 OpenShift 更新服务(OSUS)作为位于公共 API 后面的托管服务来提供无线更新,但在本例中,我们重点关注非联网模式。这份 OpenShift 集群管理更新指南对 OSUS 进行了更加详细的阐述。
在非联网/隔离环境中执行 OpenShift 更新有两种方法:不使用 OpenShift 更新服务操作器(OSUS)或使用 OpenShift 更新服务操作器(OSUS)。
不使用 OpenShift 更新服务操作器(OSUS)
首先,让我们来看一下将 OpenShift 集群从 4.13.17 更新到 4.13.18 的最简单的选项。请在笔记本电脑或其他可使用 oc 命令并且具有有效互联网连接的系统上执行以下命令:
$ export OCP_RELEASE_VERSION=4.13.18
$ export ARCHITECTURE=x86_64
$ oc adm release info -o 'jsonpath={.digest}{"\n"}' quay.io/openshift-release-dev/ocp-release:${OCP_RELEASE_VERSION}-${ARCHITECTURE}
sha256:d0fd9d3ab8690605f816c879d74f4e6d6d9f72982f63a3e0ef3e027ecc512e1c
获取上一命令的输出,并使用输出内容从您可以访问 OpenShift 集群的 bastion 节点升级 OpenShift 集群:
$ oc adm upgrade --allow-explicit-upgrade \
--to-image quay.io/openshift-release-dev/ocp-release@sha256:d0fd9d3ab8690605f816c879d74f4e6d6d9f72982f63a3e0ef3e027ecc512e1c
Requested update to 4.13.18
$ oc get clusterversion
NAME      VERSION   AVAILABLE   PROGRESSING   SINCE   STATUS
version   4.13.17   True        True          78m     Working towards 4.13.18: 106 of 843 done (12% complete), waiting up to 40 minutes on etcd, kube-apiserver
$ oc get clusterversion
NAME      VERSION   AVAILABLE   PROGRESSING   SINCE   STATUS
version   4.13.18   True        False         5m25s   Cluster version is 4.13.18
有关更新 OpenShift 的更多信息,请参阅 官方文档。
使用 OpenShift 更新服务操作器(OSUS)
要使用 OpenShift 更新服务操作器(OSUS),您必须配置对一个安全注册表的访问权限(如果该注册表与用于安装的注册表不同)。这不适用于本文,因为我们使用的为本地镜像注册表。
如果镜像注册表与安装时使用的注册表不同,您还必须 更新全局集群提取密钥才能访问您的镜像注册表。这不适用于本文,因为我们使用的为本地镜像注册表。
若要使用 OSUS,您必须先从 Operator 中心安装 OSUS 操作器。
然后,为 OpenShift 更新服务创建图形数据容器镜像。本文中的示例不需要执行此步骤,因为本文使用了 oc mirror 来对镜像进行镜像,并在镜像时在 ImageSetConfiguration 文件中包含了 graph: true。
完成后,安装 OSUS 应用并将集群配置为使用本地 OpenShift 更新服务。使用 UpdateService.yaml 应用必要的配置。例如:
apiVersion: updateservice.operator.openshift.io/v1
kind: UpdateService
metadata:
 name: update-service-oc-mirror
spec:
 graphDataImage: bastion.j9287.dynamic.opentlc.com:8443/openshift/graph-image@sha256:a8730004abd6a4c1d02f52d8052a69a014a4e3de677135b2dfe50259fb6b63fa
 releases: bastion.j9287.dynamic.opentlc.com:8443/openshift/release-images
 replicas: 2
在安装了 OSUS 应用后,运行以下命令,以使 CVO(集群版本操作器)从本地安装的 OSUS(而非通过互联网)拉取图形数据。
$ export NAMESPACE=openshift-update-service
$ export NAME=update-service-oc-mirror
$ export POLICY_ENGINE_GRAPH_URI="$(oc -n "${NAMESPACE}" get -o jsonpath='{.status.policyEngineURI}/api/upgrades_info/v1/graph{"\n"}' updateservice "${NAME}")"
$ export PATCH="{\"spec\":{\"upstream\":\"${POLICY_ENGINE_GRAPH_URI}\"}}"
$ oc patch clusterversion version -p $PATCH --type merge
如果在执行 oc adm upgrade 命令时返回证书错误,请确保您已启用集群范围代理,并且 配置 CA 以信任更新服务器。
最后,执行上一节中所述的更新过程。如需进一步了解 OpenShift 更新服务操作器,请参阅 文档。
结语
本博客提供了有关如何使用镜像注册表和 oc mirror 等工具为非联网/隔离安装设置本地存储库的详细说明。在掌握了这些知识后,OpenShift 管理员不仅可以使用本地镜像的镜像安装 OpenShift 集群,还可以进行升级和更新。
关于作者

With over 23 years of professional IT experience, Prakash Rajendran is passionate about partnering with customers to ensure open source and emerging technologies bring them value and competitive advantage in today's fast-changing industry landscape. Serving as a Senior Specialist Solution Architect at Red Hat, Rajendran is delivering successful Red Hat OpenShift workshops/PoCs/deep dive technical discussions for small to medium teams of technical and non-technical backgrounds that shape the customer's use cases and architecture design decisions.
Rajendran specializes in designing, creating and delivering content that helps Red Hat sell, service and support OpenShift at scale. He works closely with internal product teams, Product Engineering, Professional Services, Global Support and Sales to ensure a world-class customer experience with Red Hat solutions.

With over 25 years of professional IT experience, Didier Wojciechowski is a passionate advocate for innovation. Serving as a Principal Solution Architect at Red Hat, Didier Wojciechowski is a pivotal EMEA resource for leading customer projects that demand strategic technology integration and systemic thinking. They are known for their collaborative team approach, which is driven by a keen understanding of business needs and opportunities.
Wojciechowski specializes in designing, validating and supporting end-to-end solutions that tackle complex technical, business and commercial challenges. His methodology has consistently delivered creative solutions to drive IT and business transformation in the hybrid cloud era, where innovation is key. Wojciechowski has been at the forefront of the tech industry for many years, having spent the first part of his career at Oracle before joining the Red Hat team in June 2016 with a strong focus on creating innovative value.


